Ham & Cheese Breakfast Casserole

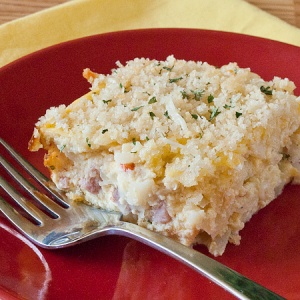
Today’s recipe is for a breakfast casserole that includes some fun ingredients to change things up.  Yes, it includes eggs, ham, and cheese.  However, it also has chives-and-onion cream cheese, southwest style hash browns, roasted red pepper, Parmesan cheese, and panko bread crumbs.  I especially loved the panko topping.  It added a nice crunch.  It only fills an 8 or 9 inch square dish but could easily be doubled  and made in a 9 x 13.

The other great thing about this dish is it is suppose to be made at at least 4 hours in advance.  So make it the night before and then in the morning all you have to do is throw it in the oven.  I know you all love a good overnight breakfast or brunch dish.  They make life easier.  This one is also full of flavor.  YUM!

It would be perfect for Easter morning or a great way to use up leftover ham from Easter dinner.

Cheesy-Ham-Breakfast-Casserole

Cheesy Ham Breakfast Casserole

  • 5 eggs
  • 3/4 cup milk
  • 1/2 cup chive-and-onion-cream cheese, softened
  • 1/2 tsp ground mustard
  • 1/4 tsp salt
  • pepper to taste
  • 2 cups refrigerated southwest style shredded hash browns from a 20 oz bag (I used Simply Potatoes)
  • 1 cup cheddar cheese
  • 1/4 cup roasted red pepper, diced
  • 2/3 cup of ham
  • 1/2 cup panko bread crumbs
  • 1/4 cup shredded Parmesan cheese
  • 1 Tbsp butter, melted
  1. Spray a 8 or 9 inch square baking dish with non-stick cooking spray.
  2. In a large bowl, beat the cream cheese while slowly adding in the milk.  Then beat in the eggs, mustard, salt, and pepper.  Stir in the hash browns, cheddar cheese, roasted pepper, and ham.
  3. Pour the mixture into the prepared square baking dish.  Cover with foil and refrigerate for at least 4 hours or overnight.
  4. In the morning, preheat oven to 350 degrees.  Uncover the casserole and bake for 40 minutes.  While it bakes, combine the panko bread crumbs, Parmesan cheese, and melted butter together in a small bowl.
  5. Remove casserole from the oven and sprinkle the bread crumb mixture even over the top of the casserole.  Return to the oven for 10 to 15 minutes more until the bread crumbs are golden and a knife inserted in the center comes out clean.  Cut into 6 pieces and serve.

~Enjoy!

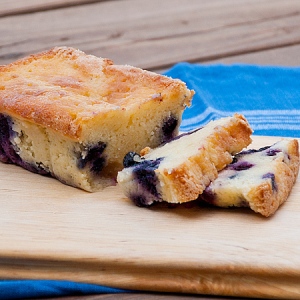
Blueberry Lemon Bread

Blueberry Lemon Bread
Blueberries and Lemons go together in baking like apples and cinnamon… truly!  Whether it’s muffins, cakes or breads, the combination of those two flavors are a dynamite pairing, and today I’m bringing you a fantastic bread that has a glaze on the top that really kicks this recipe up a notch and makes it a stand-out one you’ll love.  Try it, you won’t be sorry!
 Lemon Blueberry Bread
Ingredients
  • 1½ cups flour
  • 1 tsp baking powder
  • ¼ tsp salt
  • 6 Tbsp butter, softened
  • 1⅓ cup sugar, divided
  • 2 eggs
  • 2 tsp lemon zest
  • ½ cup milk
  • 1½ cup fresh blueberries
  • 3 Tbsp lemon juice
Instructions
Preheat oven to 325 degrees.  Grease and flour a 8½ x 4½ x 2½ loaf pan and set aside.  In a bowl, whisk together the flour, baking powder, and salt.  In another bowl, cream together the butter with 1 cup of the sugar with a electric mixer until light and fluffy.  Add eggs, one at a time, to the butter mixture. Beating well after each addition of egg. Beat in the lemon peel.  Next, add ⅓ of the flour mixture to the butter mixture. Then alternately add half the milk with half of the remaining flour mixture, being sure to end with the flour.
Toss the blueberries in about ½ tsp flour to coat. This will prevent them from sinking in your bread. Fold the blueberries into the batter.  Pour the batter into the prepared loaf pan.
Bake for 60 minutes until golden and a toothpick inserted in the center comes out clean.  While the bread cooks, add the remaining ⅓ cup sugar to a saucepan along with the 3 tbsp lemon juice. Bring to a boil and then remove from the heat.
Once the bread is cooked, pierce the top of the bread with a toothpick several times. Be sure to not go all the way through the loaf.  Pour the hot lemon/sugar mixture over the bread.  Allow to cool in the pan for 30 minutes, then remove from the pan and allow to cool completely.
~Enjoy!

Blackberry Cobbler Bars

Life dealt some pretty ugly blows to our family the last few months that had me in the hospital for surgery and MIA from here, but I’m back and ready to share some more recipes!  🙂

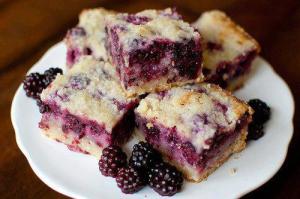
Blackberry Cobbler… blackberry pie… YUM right?  How about that same awesome flavor and taste in a BAR?  You know… like lemon bars, etc… only BLACKBERRY people!  *swoon*  Here you go… just in time for spring and those luscious berries to tantalize your tastebuds!

blackberry pie bars

Ingredients:
Crust and Topping
3 cups all-purpose flour
1 1/2 cups sugar
1/4 tsp salt
1 1/2 cups (3 sticks) unsalted butter, chilled

Fruit Filling:
4 large eggs
2 cups sugar
1 cup sour cream
3/4 cup flour
pinch salt
zest of 1/2 lemon
1 tsp almond extract
2 (16-oz) packages frozen blackberries, thawed and drained

Directions:
To make the crust and topping, preheat the oven to 350 degrees. Grease a 9×13 inch baking pan.

Combine the flour, sugar, and salt in the bowl of a food processor. Pulse a few times to mix. Cut the butter into 1/2-inch cubes, and add to the flour mixture. Process until the butter is evenly distributed but the mixture is still crumbly, 30-60 seconds.

Reserve 1 1/2 cups of the mixture to use as the topping. Press the remaining mixture into the bottom of the pan, and bake 12-15 minutes. Cool for at least 10 minutes.

To make the filling, whisk the eggs in a large bowl, then add the sugar, sour cream, flour, salt, lemon zest, and almond extract. Gently fold in the berries and spoon the mixture over the crust. Sprinkle the remaining flour mixture evenly over the filling, and bake 45 to 55 minutes.

Cool at least 1 hour before cutting into bars, or scoop out of the pan to serve cobbler-style.

~Enjoy!

Grandma’s easy-peasy “no fail” Raspberry Jam <3

Grandma’s easy-peasy “no fail” Raspberry Jam 🙂

Ridiculously Easy Raspberry Jam

I’ve had terrible luck at making jams without Surejell or Certo. Until this one. Dear Hubby recently gutted, overhauled and rearranged our kitchen and one of the blessed benefits of that was that I finally had all my cookbooks & hand-written recipes passed down from family & friends all in one spot… In going through those beloved treasures I came across my grandma’s “no fail” raspberry jam that requires no Surejell or Certo. Who am I to question my deceased grandmother? I wasn’t stupid enough to question her when she was alive, I am sure not going to start nay-saying her now.

This jam is a BEAUTIFUL jewel tone with seeds evenly suspended throughout. I have tried many different recipes and they were either too sweet or cloudy or the seeds floated to the top. The trick to remember with this jam is just match the cups of berries to the cups of sugar. If you like your jam a little more “tart”, squeeze about 1/2 c. lemon juice onto the berries before boiling them. This recipe can easily be used to make raspberry, strawberry and blueberry jams that turn out beautifully! 🙂

Ingredients:

4 cups mashed raspberries

4 cups sugar

That’s IT for ingredients. No muss, no fuss; I TOLD you this was easy!  🙂

Instructions:

  1. Use a very large pot.
  2. When the jam reaches a full rolling boil it will double in volume.
  3. Heat mashed berries until they reach a full rolling boil; stir the mixture so seeds don’t burn to the bottom of your pan, that’s a complete PITA to scrub off.
  4. Boil 2 minutes.
  5. Add sugar.
  6. Stir well.
  7. Bring to a boil, stirring constantly, boil for 2-6 minutes. (2 min’s for thinner jam; 4-6 minutes for thicker jam.)
  8. Remove from heat.
  9. Beat with rotary beater for 4 minutes.
  10. Pour in sterilized jars and seal.

That my lovelies, is that!  10 simple steps to the most amazing, divine red raspberry jam that even my 9 year old can make. 🙂

Enjoy!

🙂

Grandma’s smooth as silk Seedless Blackberry Jam

People in the Pacific Northwest take wild blackberries for granted. In fact, they’re something of a nuisance, lining highways and filling empty lots (my dad once had to rent a backhoe in order to clear the brambles from a section of our horse pasture after he got sick and tired of trying to use Roundup to no avail.) In August, it’s easy to freely pick gallons of blackberries (you may sacrifice a bit of skin in the process – wild blackberries have very sharp thorns) at local parks, nature reserves and backyards. Just make sure to watch where you’re picking, last summer my parents got scolded after accidentally wandering onto someone’s property while picking berries at the very furthest most point of a dead end road.

mmmm… blackberries…

Blackberry jam was one of my grandma’s specialties, so this recipe was hers before it was mine. She’s the one who taught me to mash the berries through a strainer to remove the seeds before turning them into jam (it’s a necessity with wild berries, as they tend to be seedier than cultivated berries. If you have more civilized berries, the deseeding process is optional). She’s also the one who showed me how wonderful a smear of blackberry jam can be on a slice of peanut butter toast mid-February. It’s a deep, deep purple color, and if you take the time to strain it, is almost entirely seedless and is particularly amazing on pancakes.  🙂

Seedless Blackberry Jam (makes approximate 3 pints)

6 cups blackberry pulp (8-9 cups of berries, mashed through a strainer with the back of a wooden spoon)

4 cups sugar

2 teaspoons cinnamon

1 teaspoon freshly grated nutmeg

1 lemon, juiced and zested

1 packet liquid pectin (half the box)

Instructions:

Prepare your jars, start your lids to simmering and bring your canning pot to a boil.

In a large, non-reactive pot (stainless steel or enameled cast iron), combine the sugar and fruit pulp and bring to a simmer. Add cinnamon, nutmeg and lemon zest/juice and stir to combine. Let the mixture reach a boil, stirring frequently to prevent it from boiling over. When the mixture appears to be thickening a bit, bring it back to a roiling boil and add the pectin. Let it boil vigorously for at least five minutes to activate the pectin.

Fill your jars with the hot jam, wipe rims, apply lids and rings and process in a boiling water canner for ten minutes.

Remove from canner and allow the jars to completely cool on a dishtowel-lined counter top.

Once the jars are cool, check the seals, label them and eat jam on toast in January.

Enjoy!  🙂

Homemade Pita Bread & Hummmmmmus… easier than ya think! :)

Sorry about my imposed bit of quiet on the blog here as we dealt with Dear Hubby’s health scare, but I’m back with not one but TWO recipes that go (dare I say it?) hand in hand with each other… Hummus and Pitas!  🙂

After trying this recipe for homemade hummus, I may never buy hummus again. And after reading this, you may join me. Because once I (and therefore you) figure(d) out how easy, cheap, and ridiculously delicious homemade hummus is, I decided to turn my back on the prefabricated stuff and am never looking back. That’s it! I’m done. You soak a bunch of dried chickpeas overnight (I bought a bag of roasted, dried chickpeas at Trader Joes, just because they looked… well, nuttier than the regular ones, but who knows if that made a difference), then simmer them in salted water until they’re soft. In the meantime, you make a paste out of salt and garlic, then whizz that in a food processor along with sesame seed paste and what seems like an inordinate amount of lemon juice. Trust the recipe, though! The mixture should look “contracted”, which meant nothing to me, but I stopped when it starts to look like the consistency of hummus and that turned out to be fine.

Then you add the drained chickpeas and process the mixture until an improbably creamy mass starts to form kinda looking like this:

MMMM… Hummmmmus…

Depending on how loose you like your hummus, you can add cooking liquid and lemon juice. It keeps in the fridge for a few days, though you’ll have to add some more water and lemon juice to loosen it up a bit (and let it come to room temperature, because the flavors totally bloom then). I sprinkled mine with paprika, some minced garlic and drizzled it with some EVOO.

A more appetizing plate of hummus I never did see. And the taste! Fresh and creamy, with a nutty flavor and grassy notes from the oil. The hummus had heft, but was also airy from all the processing. I’m telling you – after you make it, you’ll never want storebought hummus again. I’m so glad I tried this recipe. It was like a birthday present!

Hummus
Makes 4 cups

1 1/2 cups dried chickpeas, soaked overnight
1 teaspoon kosher salt, divided
3 garlic cloves, peeled
3/4 cup sesame seed paste
1/2 cup fresh lemon juice, and more to taste
Cayenne or hot Hungarian paprika
2 tablespoons chopped parsley
2 teaspoons olive oil

1. Rinse the soaked chickpeas well and drain them before putting them in a saucepan and covering them with plenty of fresh water. Bring to a boil; skim, add one-half teaspoon salt, cover and cook over medium heat, about 1 1/2 hours, until the chickpeas are very soft (you might need to add more water).

2. Meanwhile, crush the garlic and one-half teaspoon salt in a mortar until pureed. Transfer the puree to the work bowl of a food processor, add the sesame seed paste and lemon juice and process until white and contracted. Add one-half cup water and process until completely smooth.

3. Drain the chickpeas, reserving their cooking liquid. Add the chickpeas to the sesame paste mixture and process until well-blended. For a smoother texture, press the mixture through the fine blade of a food mill. Thin to desired consistency with reserved chickpea liquid. Adjust the seasoning with salt and lemon juice. The hummus can be kept in an airtight container in the fridge for up to a week.) Serve, sprinkled with paprika and parsley and drizzled with oil.

How to Make Homemade Pita Bread

Makes 8 rounds

There is NOTHING like freash pitas for dipping in hummus…

What You Need

Ingredients

1 cup warm water (not hot or boiling)

2 teaspoons active dry yeast or instant yeast

2 1/2 – 3 cups all-purpose flour

2 teaspoons salt

1-2 teaspoons olive oil (optional)

Equipment

Mixing bowl

Rolling pin

Cast iron skillet (for stovetop baking)

Baking sheet or a baking stone (for oven baking)

Instructions

1. Form the Pita Dough: Mix the water and yeast together, and let sit for about five minutes until the yeast is dissolved. Add 2 1/2 cups of the flour (saving the last half cup for kneading), salt, and olive oil (if using). Stir until a shaggy dough is formed.

2. Knead the Dough: Sprinkle a little of the extra flour onto your clean work surface and turn out the dough. Knead the dough for about 5-7 minutes, until the dough is smooth and elastic. Add more flour as needed to keep the dough from sticking to your hands or the work surface, but try to be sparing. It’s better to use too little flour than too much. If you get tired, stop and let the dough rest for a few minutes before finishing kneading.

3. Let the Dough Rise: Clean the bowl you used to mix the dough and film it with a little olive oil. Set the dough in the bowl and turn it until it’s coated with oil. Cover with a clean dishcloth or plastic wrap and let the dough rise until it’s doubled in bulk, 1-2 hours.

At this point, you can refrigerate the pita dough until it is needed. You can also bake one or two pitas at a time, saving the rest of the dough in the fridge. The dough will keep refrigerated for about a week.

4. Divide the Pitas: Gently deflate the dough and turn it out onto a lightly floured work surface. Divide the dough into 8 equal pieces and gently flatten each piece into a thick disk. Sprinkle the pieces with a little more flour and then cover them with a kitchen towel or plastic wrap wrap until you’re ready to bake them.

5. Shape the Pitas: Using a floured rolling pin, roll one of the pieces into a circle 8-9 inches wide and about a quarter inch thick. Lift and turn the dough frequently as your oll to make sure the dough isn’t sticking to your counter. Sprinkle with a little extra flour if its starting to stick. If the dough starts to spring back, set it aside to rest for a few minutes, then continue rolling. Repeat with the other pieces of dough. (Once you get into a rhythm, you can be cooking one pita while rolling the next one out.)

6. To Bake Pitas in the Oven: While shaping the pitas, heat the oven to 450°. If you have a baking stone, put it in the oven to heat. If you don’t have a baking stone, place a large baking sheet on the middle rack to heat.

Place the rolled-out pitas directly on the baking stone or baking sheets (as many as will fit), and bake for about 3 minutes. I’ve found it easiest to carry the pita flat on the palm of my hand and then flip it over onto the baking stone. The pita will start to puff up after a minute or two and is done when it has fully ballooned. Cover baked pitas with a clean dishtowel while cooking any remaining pitas.

7. To Bake Pitas on the Stovetop: Warm a cast iron skillet over medium-high heat until a few bead of water sizzle immediately on contact. Drizzle a little oil in the pan and wipe off the excess.

Lay a rolled-out pita on the skillet and bake for 30 seconds, until you see bubbles starting to form. Flip and cook for 1-2 minutes on the other side, until large toasted spots appear on the underside. Flip again and cook another 1-2 minutes to toast the other side. The pita should start to puff up during this time; if it doesn’t or if only small pockets form, try pressing the surface of the pita gently with a clean towel. Keep cooked pitas covered with a clean dishtowel while cooking any remaining pitas.

8. Storing the Pitas: Pitas are best when eaten immediately after cooking. Leftover pitas will keep in an airtight bag for several days and can be eaten as they are or warmed in a toaster oven. Baked pitas can also be frozen with wax paper between the layers for up to three months.

Additional Notes:

Storing the Dough: Once it has risen, the pita dough can be kept refrigerated until it is needed. You can also bake one or two pitas at a time, saving the rest of the dough in the fridge. The dough will keep refrigerated for about a week.

Pitas That Won’t Puff: Sometimes you get pitas that won’t puff. The problem is usually that the oven or the skillet aren’t hot enough. Make sure both are thoroughly pre-heated before cooking. Even pitas that don’t puff are still delicious and can be used wraps or torn into pieces for dipping in hummus.


Enjoy! 🙂

Nothing like life to interrupt your plans…

I’ve been quiet on here the last few days because life was having a go-round with my dear hubby (I’ll just refer to him as DH). I got up a few days ago to get the kids off on their first day of school & as soon as they were out the door, DH approaches me looking like he’s about to hurl, three shades of white, with legs as wobbly as a new foal. Now, I don’t know about your DH’s, but mine redefines the word STUBBORN when it comes to Dr’s and hospitals. He can’t stand them, he won’t go to them without an act of Congress or an act of war on my part. On this particular morning however, I knew we were in a whole ‘nother level of “sick” when I mentioned taking him to the doctor and he replied he thought he needed to head to the ER instead. He’d evidently been up all night dry heaving and writhing in pain in the living room on the couch so he didn’t wake the rest of the family up the night before the kids’ first day back at school. Now, I appreciate the thought of that, truly I do… HOWEVER… discretion being the better part of valor, if you are writhing in pain with dry heaves, nausea, and you generally think you are dying, MOST people wake up their spouses or significant others before 6 hours have passed. (I’m just sayin’.)

Being the good wife I am, I spared him that particular lecture until after we came home from the hospital 8 loooooooong hours and multipllllllllle tests later. First they thought it was his kidneys. Nope. Then they tested his liver. Nope. Then they heard Michael & I talking about him eating popcorn while he played Skyrim and how he hadn’t had anything to eat since then… The dr & the nurse whipped their heads, shared a look of a thousand words & promptly BET that it was Diverticulitis. For those of you who don’t know what that is, in layman’s terms according to his dr: it’s an infection in your intestinal wall where it’s gotten stretched out & food that your body can’t process (like popcorn) gets trapped and it causes an abscess and infection and just generally eff’s you ALLLLLLL up. Nasty hmm? Our biggest worry was that the infection had gotten so bad the dr was worried the abscessed area might burst & that would mean immediate surgery to repair the intestine and that would mean a good solid month in the hospital at the least. NONE of this was what either DH, myself, or the dr wanted to happen, so 4 IV doses of antibiotics, 4 IV bags of saline fluids, and umpteen doses of dilaudid later while they monitored his progress, tested & retested his blood, they finally write a mini-book of prescriptions for DH to take home with him, and send him on his merry way to sleep and rest at home now that they had a course of treatment and thought they had him stabilized and recovering somewhat.

Ohhhhh that it should be so simple and end there. Nope, my renewal lesson in “in sickness and in health, to death do you part” wasn’t quite over yet… DH then spent the next three days horizontal, passed out like the dead alternated with short grumpy-grizzly spells. He likes to think he was up & about, but that never lasted more than 10-15 minutes at a time until tonight when he finally drug his still sicky booty into work.  Let me tell ya, taking care of a sick man is like taking care of a hurt wild animal. They are cranky, liable to snap at you, pace and grumble at their weakness & are just generally better off with minimal contact until they decide to rejoin the land of the living.  DH isn’t back to his normal self by a long shot yet, but we’ll all be REALLY glad when he is.  🙂  It’s hard seeing a tough guy so sick. Messes with ya. Here’s hoping & praying he gets to feeling better soon…

Fresh Pico de Gallo… I use this a lot. A LOT, a lot.

Fresh Pico de Gallo… I use this a lot when cooking. A LOT, a lot. I use it in dinner dishes, appetizer dishes, by itself for an appetizer, in guacamole… I am telling you: I use this stuff like it’s going out of style (which it’s NOT).

The best pico de gallo I have ever had was on our honeymoon in Mazatlan. I survived on pico de gallo, fresh guacamole with chips, fresh shrimp and daquiris because I was scared I would get sick from anything else and I had learned the year before to avoid Tequila at all costs. That was almost 18 years ago & I still avoid the tequila, but I LOVE me some Pico de Gallo! Now I would probably eat anything there without any trepidation. Maturity or stupidity… it’s a tough call. 🙂

Pico de Gallo is such an amazing salsa because you don’t daintily dip your chip. No, you scoop that salsa and enjoy a delicious mouthful of tantalizing fresh flavors that makes you dive right back into the bowl. It takes all of 5 minutes to pull together and you can serve immediately or let is sit in the fridge for a couple hours – very flexible. The recipe calls for Roma tomatoes but use what you have on hand.

Last but not least, think of Pico de Gallo as a symphony… sorry, but I think in musical terms a lot, so bear with me and hear me out. Some people tend to put more tomatoes than anything else (for whatever reason). Now, on their own, I’m not particularly fond of onions, or jalapenos, etc… but they really are all doing their own part to balance this dish, so don’t skimp on the onion, garlic or cilantro, etc… You are just going to have to either trust me on this or end up unhappy with your Pico, because they really do all blend beautifully into this gorgeous explosion of taste that makes your tastebuds sing. (Aren’t you glad I finally circled to the point and landed that plane?) *wink*  Anyhow, enjoy the Pico. Throw it in a chicken casserole, over your omelette, eat it with chips, the uses are simply as limited as your mind and creativity. 🙂

Ingredients:

5 plum tomatoes (I use Romas and you want them firm, not soft)

1/2 large or small onion

1 jalapeno

1/2 cup cilantro

1/2 lime

1 teaspoon garlic, minced

salt, pepper to taste

*Quantities are approximate

Instructions:

Chop jalapenos, onion, and tomatoes in a very small dice. I typically cut the seeds and the “jelly” part out of the tomatoes, leaving just the meat of the tomatoes for my pico. If you leave them in, your pico will be juicier and runnier. Some people like that consistency when it’s more like salsa, I happen to like the fresco version that you chomp & scoop. LOL! I use my food basher-chopper thingie-ma-bobber from Pampered Chef I got years ago to do all this dicing, but the Cuisinart works well too if you’re feeling lazy.

Leave the seeds in your jalapenos for a hotter pico. Adjust the amount of jalapenos for your preferred temperature. Next, chop up a nice-sized bunch of cilantro, about a half cup or so. Throw away the long stems before chopping. Stir together. Add the juice of a half a lime and add salt to taste.

Enjoy!

Mama’s Easy Breakfast Casserole

I was blessed with a really good memory when it comes to names. For example, I can name everyone in my kindergarten class with Mrs. Baskin at McSorley Elementary along with a random fact about each person (her all time favorite flower was a buttercup & her dog’s name was Roscoe). Somehow I continued to accurately fill the slots in this computer brain of mine over the years with dates, names, and people. Now…on any given day, I can automatically start spewing the birthdays and anniversaries of random people from my past when asked a question about them, or if I see their picture.

But… then I had kids. And they sucked the brain cells out of my head.  I’m lucky now if I can remember their names. As a matter of fact, sometimes I will just randomly start spewing out ALL their names knowing if I list them all, the one who I am actually referring to will hear me and have to respond. Don’t argue that logic until you have birthed multiple children and given your brain 5-10 years to stew in its own fried juices… LOL!

When I do something like book an appointment for the wrong day or forget where I hid birthday presents, my husband will say, “Honey, your poor brain.”  After all, he knew me as the woman who could remember his cousin’s best friend’s boyfriend and the names of everyone that came to our wedding…from his side. The good news is that anything I had stored in my brain before kids, is still there. And I can still access it when I’m back in my hometown at Strike & Spare and run into half of my high school. Even if we weren’t friends, I probably know your name and your birthday. But it’s not really something I’ll let on, because from experience I found it freaks people out when you still know minute details about them from when they were little, when you hardly know them now as adults. It comes off a bit stalkerish, I guess.
The really fantastic news for you, is that I can clearly recall the Christmas Eve night I learned how to make the best breakfast casserole, and the perfect Christmas morning present to yourself & your family. It’s my Grandma’s recipe, tweaked by my mama (she liked spinach in hers *shudder*), and now tweaked by me.
Mama’s Easy Breakfast Casserole
(We recently ate this for dinner though, so don’t be limited to making this just for breakfast!)  🙂
Ingredients:
1/2 loaf of french bread cut into 1 inch cubes (enough to cover 9×12 pan bottom)
12 eggs1 cup milk

3-4 chopped potatoes

1/2 grn pepper

1/2 red pepper

1/4 c. chopped onion

(optional): 1 tablespoon fresh chopped parsley

1 pkg chopped bacon OR 1 lb. cooked sausage (or if you’re feeling adventurous BOTH)

1 cup finely shredded cheese (we use colby-jack OR the mexican blend depending on mood)

Idea: after Thanksgiving, we chop up about 2 cups turkey meat (or ham) and add that for the meat

Instructions:

Preheat oven to 350 degrees.  Lightly grease a 9×12 pan.  Place bread cubes so they make a nice single layer on the bottom of the pan.  On the stovetop, cook your bacon in a large skillet.  Strain oil off.  Once done, chop into 1/2 inch pieces (you want them kinda big).  Use the same pan you made the bacon (or sausage) in:  cook the onions, peppers and potatoes.  Cook on medium heat for maybe 5 minutes until the potatoes start to transition from transulcent to opaque.  When this occurs, spread these in a nice even layer over the bread in the 9×12 pan.  Spread/sprinkle the bacon bits over this.   Mix the eggs and milk together & then slowly pour back and forth over the pan making sure the egg mixture gets everywhere in the pan.  The egg mixture will look like it’s about 1/2 to 3/4 of the way up to the top of the pan, don’t worry, they fluff up nicely!  🙂  Sprinkle the shredded cheese evenly over the top of all of this evenly, cover with tin foil.  Bake for 50-60 minutes, or until the center is firm.

My kids are INSANELY picky & all four of them LOVE this dish!  We’ve even made this on campouts in a dutch oven & it’s so yummy & filling.  If you are prepping this dish for the next morning, do everything except bake it (put it in the fridge overnight). Pull it out about an hour and a half before you want to eat. Let the dish sit at room temp about 20 minutes or so to lose it’s chill, preheat your oven, and then pop it in to bake for the 50-60 minutes.

ENJOY!   🙂

Oh-Ma-Gawsh! Banana Muffins & Bread

Good Morning! This recipe is an evilly delicious concoction. I will apologize now… because as soon as you make this recipe your family won’t want any other banana bread or muffin recipe ever… THIS one is the one they are always going to ask for. Don’t say I didn’t warn you. 😛  The true beauty of this recipe is in its simplicity. It is as easy to follow this recipe as it is to throw out the browning bananas you have sitting on the counter…  The inner beauty of this recipe is in its fabulous taste. Try it – you won’t be sorry!

My kids love coming into the house and smelling these muffins baking, or better yet, waking up to them in the morning. They go extremely quickly and I know from years of baking them that they freeze well, but since having kids I’ve not had the opportunity to save them for lunches, etc… because I swear to you my kids have a built in radar for these things. They are quick, easy and this whole recipe only takes ONE BOWL! (unless you add the topping, and then you are up to a whopping two bowls)  Yes, yes, I know… you are welcome; it is my absolute pleasure to be able to save you time and energy and still provide you a kick-ass recipe. *wink* They are very moist, fluffy, and the buttery taste… Dear God in heaven, the buttery taste! I won’t judge you when you close your eyes in appreciation of this recipe, truly, it’s pretty freaking magnificent if I do say so myself.

Oh-Ma-Gawsh! Banana Muffins/Bread

Ingredients

3 to 4 ripe bananas (I always use 4 if possible)

1/4 cup melted butter

1 cup sugar (½ white, ½ brown)

1/2 teaspoon nutmeg

1 1/2 cups flour

1 teaspoon cinnamon

1 teaspoon baking soda

1 teaspoon vanilla

1/4 teaspoon salt

1 egg, beaten (if med. eggs, use 2 eggs)

Chocolate chips (as few or as many as you want!)

Preparation

Preheat oven to 350°F. Before I tell you to mash the nanners, let me just tell you this one tip I’ve learned the hard way: OVER MIXED MUFFINS ARE FLAT (and suck, if we’re being honest).  That being said, mash the bananas in a bowl (not too much), leave ½ inch sized chunks of the bananas when mashing, they make the muffins Ah-maze-ing! Trust me on this. Add all the remaining ingredients and mix with a wooden spoon. If you mix this with a blender you’ll flat ruin the consistency and texture we’re going for here… trust me on this, go old school this one time and you will NOT regret it.

If making bread, bake in a buttered loaf pan until a toothpick stuck into the bread comes out clean, 55 to 60 minutes. Slice and serve.

If making muffins, bake about 25 minutes until golden brown and toothpick comes out clean. Fill muffin cups with 2/3 cup batter each and sprinkle with the topping. If you have a standard ice cream scoop, this is the perfect size to scoop for muffins.

*notes: depending on your oven and how hot it cooks, it may turn out better to lower the temp a little and cook the 60 min’s for the loaf. This turns out very well in lined/well-greased muffin tins or a 9×9 pan.  If using a loaf pan, BUTTER THE PAN VERY WELL.  This recipe has a very moist, very buttery flavor – it’s a huge hit and family favorite!  If your bananas aren’t quite ripe enough, try putting then in a brown bag with an apple and folding over the top. In 4 hours the bananas should have ripened to the right level.

Optional Streusel Topping

  • 2 TBSP cold butter, cut into small cubes or grated
  • 1/8 cup rolled oats
  • 1/8 cup white sugar
  • 1/8 cup brown sugar
  • a pinch of cinnamon

Use a fork to stir these ingredients together in a small bowl. Set aside & sprinkle a spoonful on top of each muffin cup’s batter just before placing in oven to bake.

Enjoy!